3 Tips when Writing on Textured Paper

If you've been on Instagram long enough, you probably came across gorgeous handmade paper. There's just something about seeing calligraphy written on slightly textured paper. I enjoy incorporating it whenever I can - towards workshop placecards, cards, envelopes, etc.
However, you may quickly realize that writing on textured paper is not as easy as it looks.
Here are 3 tips to make this experience more enjoyable:
- Check your nib. Generally, I like to use a nib with a sturdy tip. Nothing too sharp or too flexible. I avoid nibs like Hunt 101 but gravitate towards nibs like Nikko G or Gillott 404. I find that the more flexible the tip is, the harder it is to control on the upstrokes, especially against all the fiber on the paper! Make sure to experiment with a couple of nibs on a scrap paper before you write on your final paper.
- Check your ink. Do a scribble on your paper and see if your ink is flowing easily from your nib. Sometimes the ink that worked well on smooth paper won't ...
*NEW* Guidesheet for Ascending/Descending Stem Loops
I'm currently guiding my students through my Copperplate Foundations course and noticed that students have been struggling with consistency in their ascending/descending stem loops:

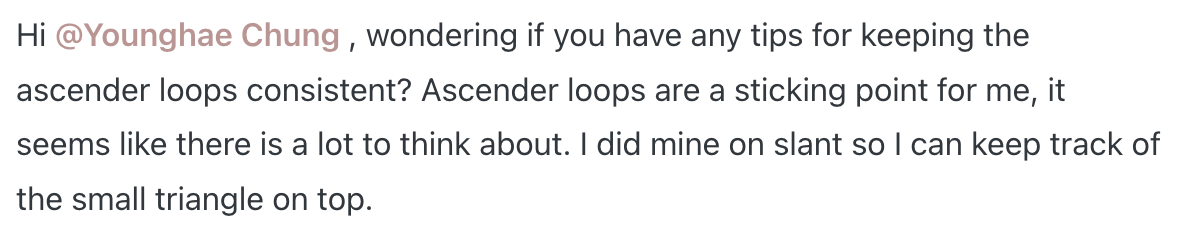
Below are some examples of students' homework sheets. If we're not careful, the loops can either become too narrow or too rounded:

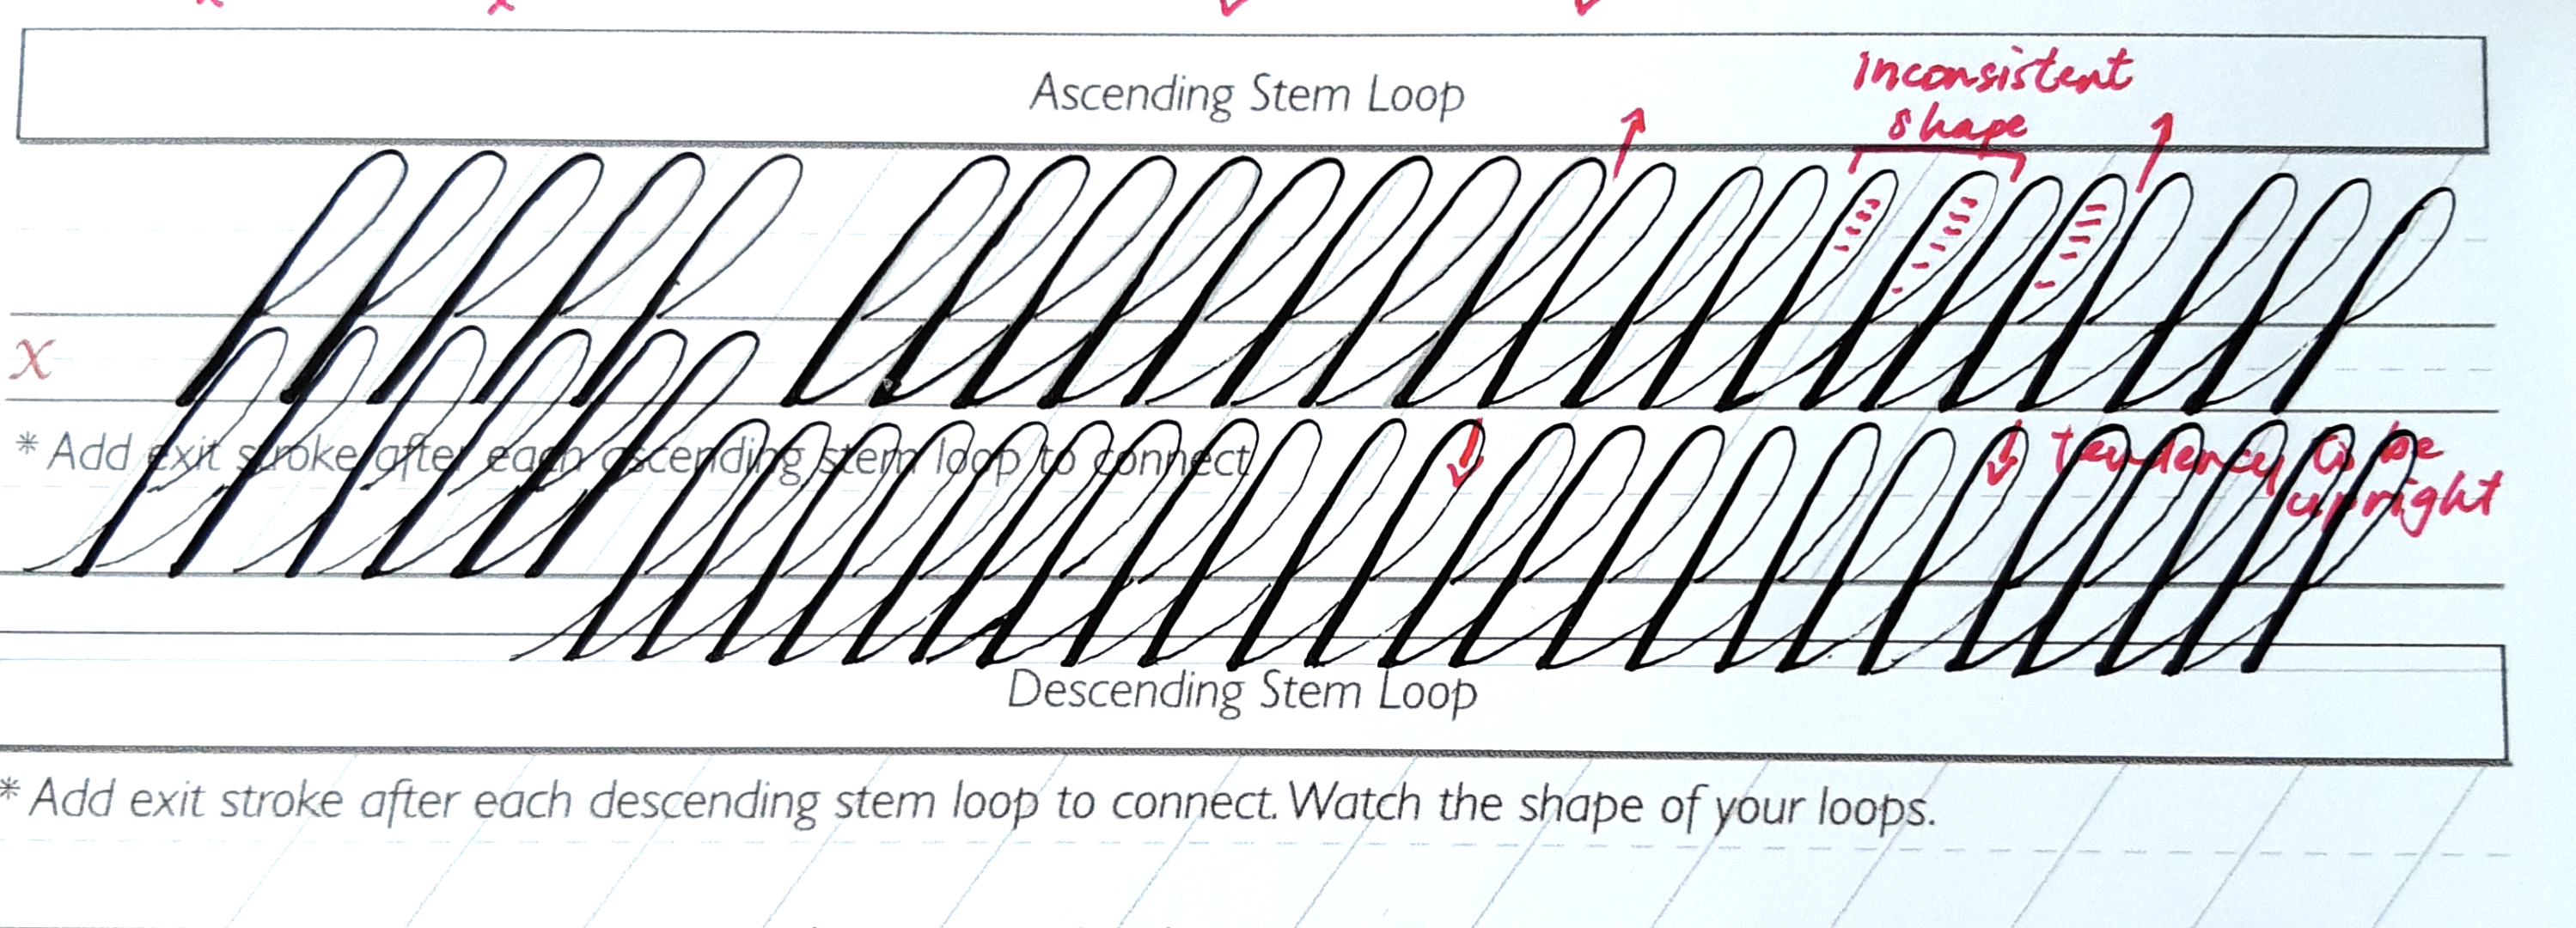
An important key to achieving consistency in the ascending and descending stem loops is to visualize an oval within the loop. Here is an example of lowercase letter 'g' and 'l' where I drew in an oval with a pencil before writing the letters with a red pen:
This demonstration gave me an idea to create a new guidesheet so you can use it to practice those stem loops! In the new guidesheet, I added ovals along the ascender and descender line so that you can practice both the ascending/descending stem loops. Remember that these ovals are meant to be used as a guide so it's okay if your stem loops don't contain the entire oval. Take your time, write slowly, practice, an...
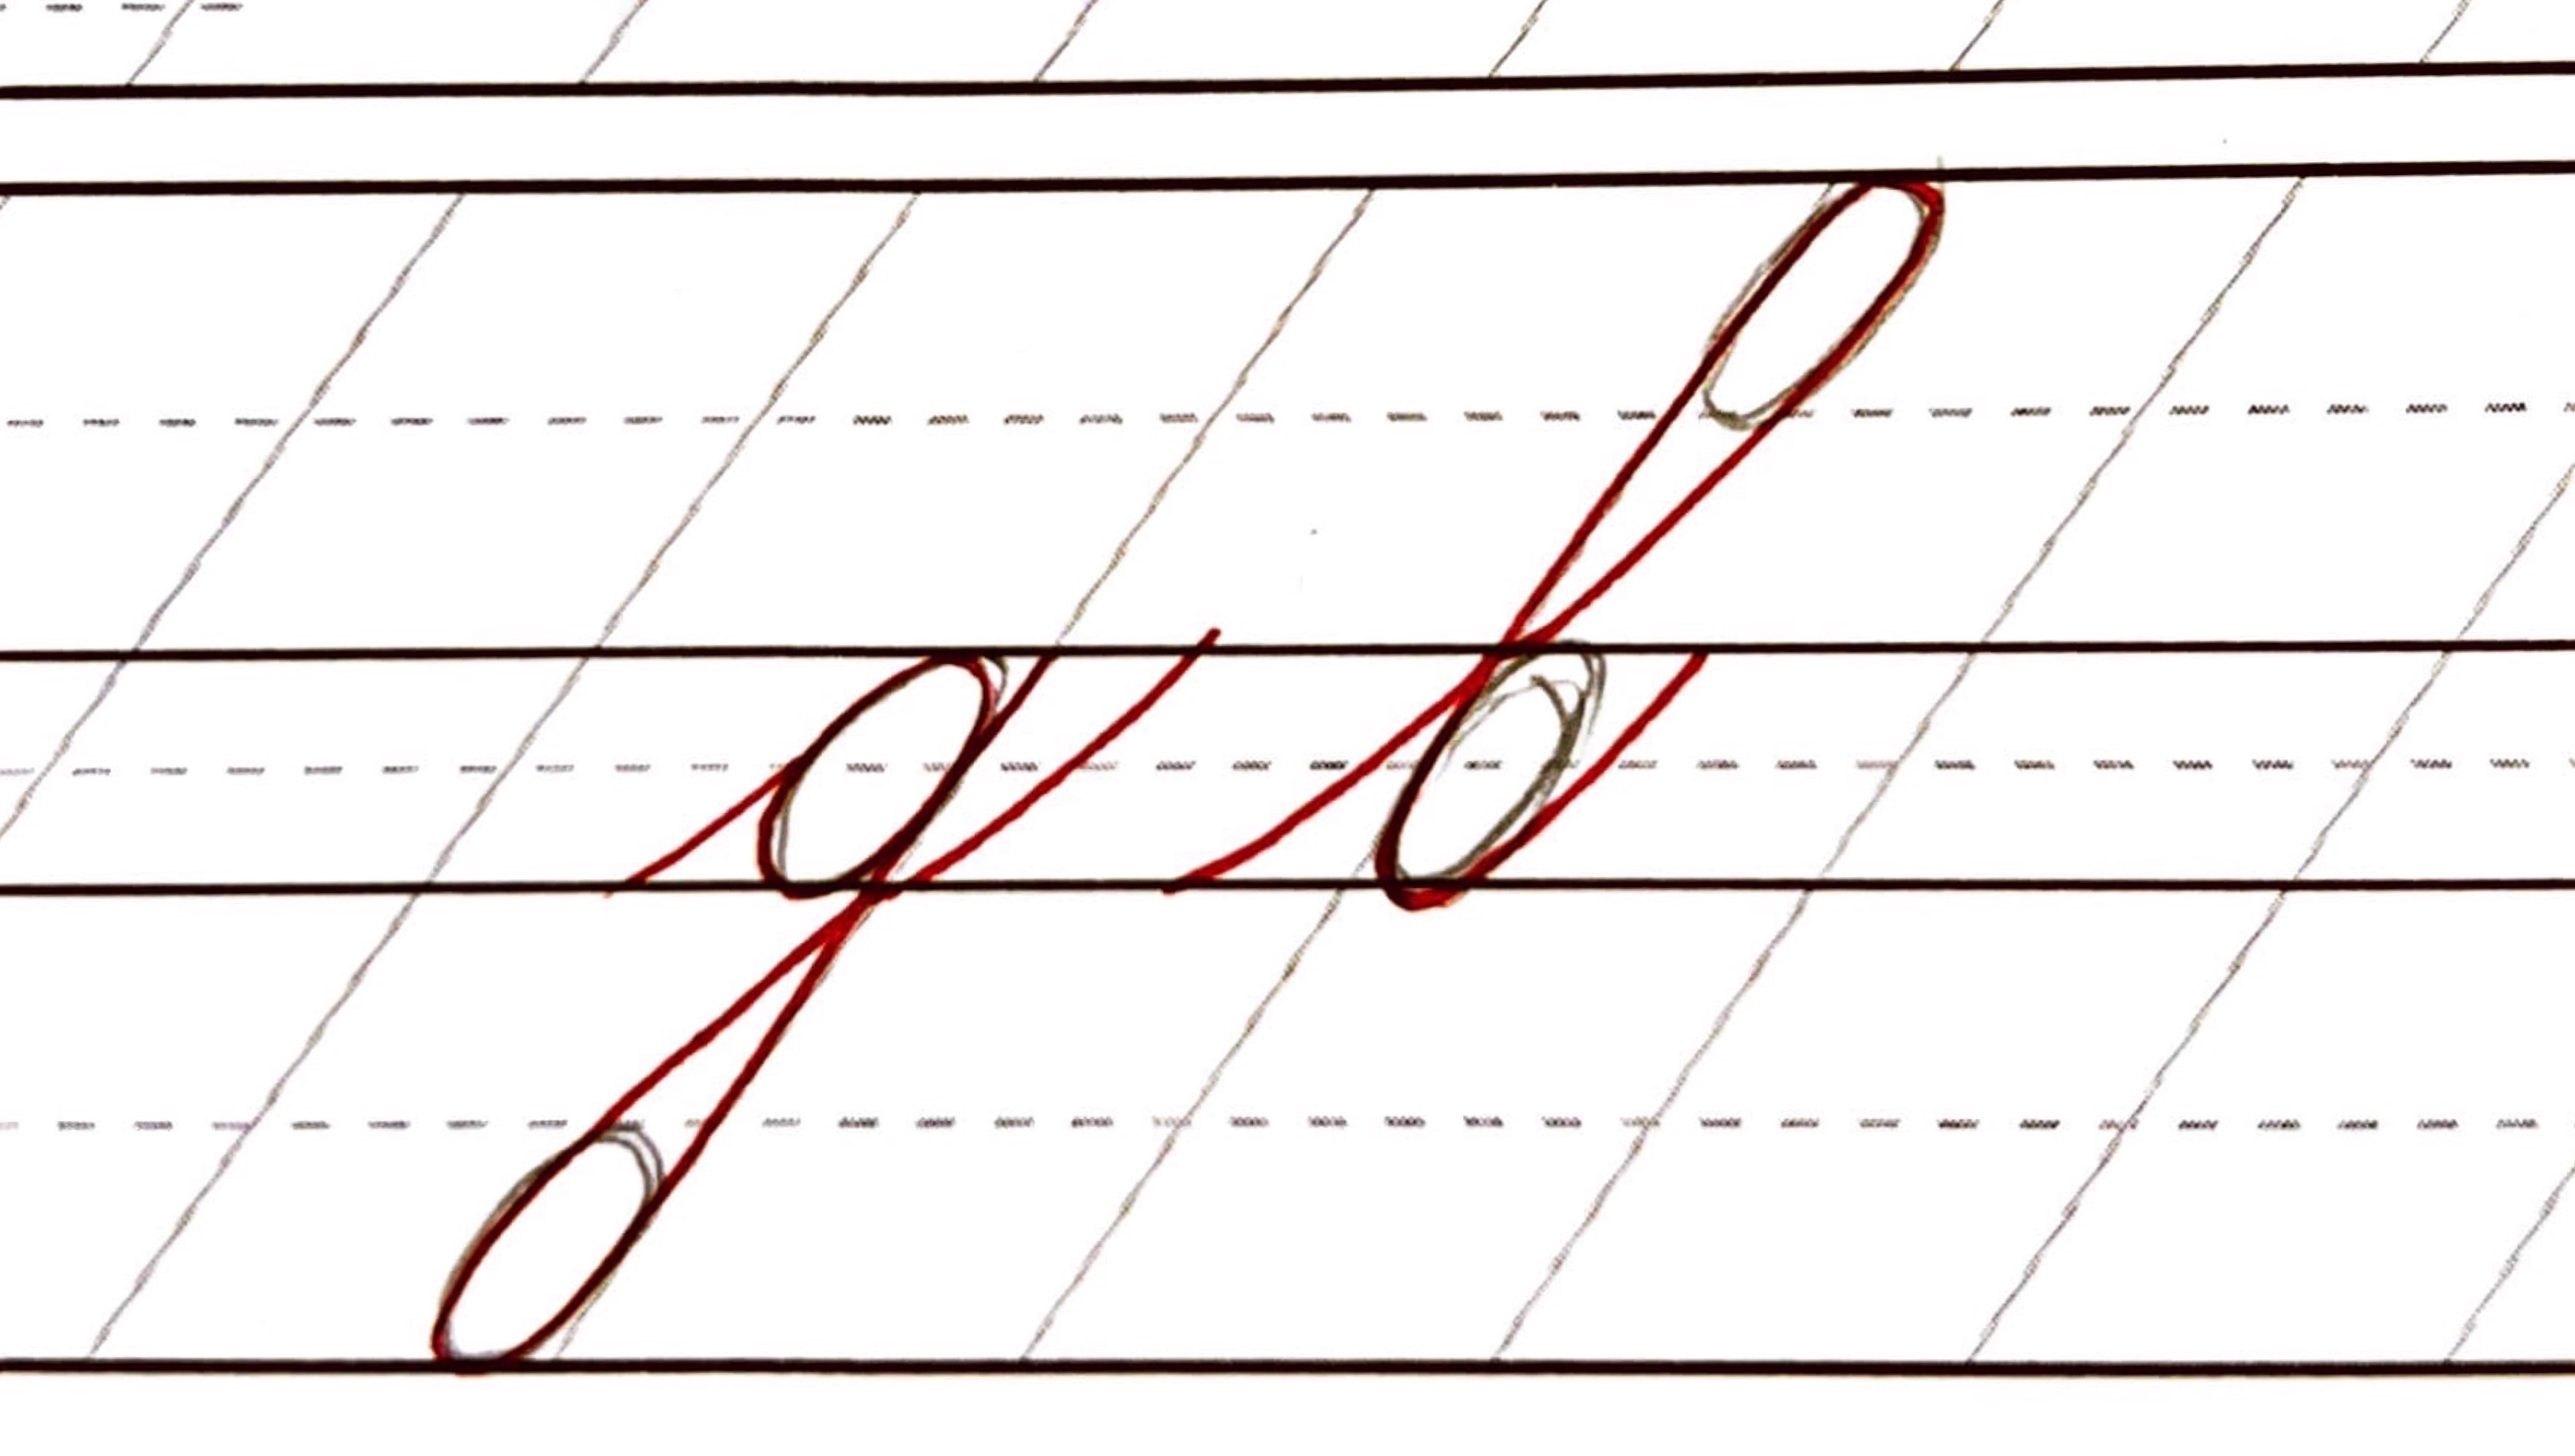
Copperplate vs. Spencerian
As I've been posting more of my Spencerian work on Instagram to gear up for my upcoming online course, I got a question recently asking what the difference is between Copperplate and Spencerian script.
Before we talk about the differences, let's talk about the similarities between these scripts:
- Copperplate and Spencerian are both written with a steel, flexible pointed nib. So, as long as you know how to write with a pointed nib, the transition and learning curve will be easier to go from one to another. I personally learned Copperplate first and then picked up Spencerian a year later, but you can also begin with Spencerian and move onto Copperplate. These scripts complement each other so wonderfully.
- Both scripts are written on a slant. The standard slant line is 55° for Copperplate and 52° for Spencerian. When teaching, I use the standard as our guide but the difference of 3° is so minor that when you eventually write without guidesheets, you can mix these scripts together (ex ...
STMABD = Small Things Make a Big Difference

With my Copperplate Foundations registration opening up around the corner on 4/19, this saying came to mind - "Small things make a big difference". That doesn't just apply to calligraphy but all part of our lives. I find that it's the seemingly small & mundane choices we make (from the food we eat to what we believe to be true in our minds) that will have the biggest impact in our lives.
This is my 8th year since embarking on this calligraphy journey and if there's any tip I would share to beginners, it would be to choose quality over quantity when it comes to practice times. Being intentional with the 20 minutes you have will be of greater value than spending 2 hours practicing mindlessly, which will lead to bad habits.
One way you can improve your script is to practice your pressure/release! Two things to keep in mind:
- We all have a unique hand. Some of us have a naturally light hand and others have a heavy hand. What does that mean? It means that for those who have a natural ...
Tips when using Finetec & Handmade Paper
As calligraphers, the words "Finetec" and "handmade paper" are no strangers to us. In fact, I actually got introduced to Finetec during my first Copperplate workshop back in 2014! My instructor had demonstrated writing our names with it and I was so mesmerized by the shimmer and how elegant it looked on paper. I bought my first palette right away and now I'm honored to be an Art Ambassador with Royal Talens who helps distribute Finetec in North America.
Finetec is a line of high quality watercolor and offers a variety of transparent, neon, pearlescent, iridescent, metallic colors that work beautifully for calligraphy.
How to use - Finetec comes in pans and in order to properly use it with a pointed nib, you will need to dilute it with water until you get a milk like consistency. Add a couple drops of distilled water directly onto the pan (I like to keep my water in a dropper bottle), mix with a brush, and load it onto the nib (both front and back!) until it covers the eye of the nib. ...
Tip: Fixing Calligraphy Mistakes!
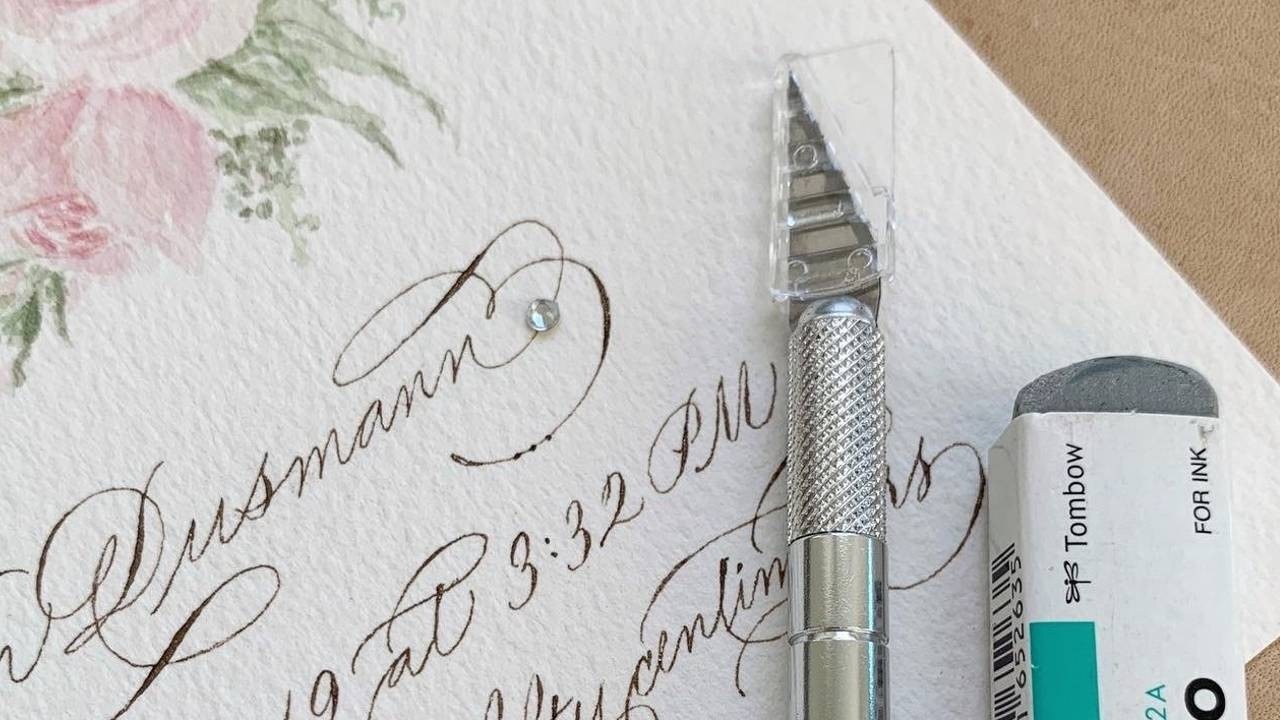
In this blog post, I am excited to share a tip on how you can save a ton of time with two simple tools!
Ever work on a project only to realize you made a spelling error?? 😩✋🏼. It seems to be a common occurrence ever since I became a calligrapher! But before you decide to start all over and spend another couple hours re-doing your piece, make sure to try this calligra-hack first! It literally saved me a couple weeks ago.

Here's the before photo. Right as I was about to ship it out, I thought to myself "Hm..let me just double triple check the spelling to make sure everything is correct". Sure enough, there was an error in her last name. It should have been Dusmann, NOT Dussman! 😩😭
Thankfully, because the number of letters remained the same, I didn't have to erase the entire flourish but only work on fixing and rewriting 3 letters.
Materials You Need:
Steps:
1. You want to take your xacto knife and gently scrape away the ink from the paper. Dep...
All about Calligraphy Penholders!

With a growing number of penholders in the market, I wanted to share some personal recommendations for either absolute beginners or those who are interested in adding another holder to your collection!
GOOD BEGINNER HOLDERS ($ - Inexpensive/Budget Friendly)
When you are just starting out, you don't need to spend hundreds of dollars on a new holder. I recommend the following either the Dual Workshop Holder ($6.49) or Moblique holder ($9-$13). They are both inexpensive, have metal flange, and ability to use for either oblique or straight holder. To use as a straight holder, you simply take out the flange and insert the nib into the inner circle. The Moblique holder comes in beautiful colors and has an inner nib compartment that may come in handy when you are on the go!

Here are other budget friendly holders that are offered under $20:
- Pointed Oblique Holder ($14.95) - These wooden holders are fitted for Nikko G for similar nibs
WOODEN HOLDERS ($-$$ - Reasonably Priced)
If you ...
My Set Up as a Left Handed Calligrapher
I often get questions asking "How do you angle your paper? Do you use a left oblique? Straight holder?", so I wanted to help answer those questions here. FYI- for my everyday handwriting, I underwrite (keep my wrist under the baseline) and hold the paper at about 45 degrees to the right.
Switching from Straight to Oblique
After taking my first Copperplate workshop in November 2014, I decided to stick to the straight holder because I could not find the right paper angle and felt extremely frustrated using an oblique. Even after writing with a straight holder for a year, I continually struggled with being able to execute smooth upstrokes (because it was going away from my body) and flourishes..but still pressed on and practiced.
In February 2016, I had an opportunity to meet Master Penman Michael Sull at the LA Pen Fair:

As I shared my struggles, he encouraged me to try the oblique again, but this time- the paper angle was at 90 degrees. One of the things that stayed with me from our...
Recent Posts
*Disclosure
Blog posts may contain affiliate links, meaning, at no additional cost to you, I will earn a small commission if you click through and purchase. Thank you for your support! ❤️

